Sunday, April 22, 2012

Mint Iced Tea

This is the tea that was on our Easter menu. Sweet tea has been called the table wine of the South, well we've upped that table wine a notch with this mint tea. It's so refreshing and delicious but be warned this tea is ADDICTIVE! Enjoy...but don't say you weren't warned!

Mint Iced Tea

Method:

Bring one quart of cold water just to a boil (not a rolling boil, just before). Remove from heat. 
Add tea bags ( I used 2 of the family size Luzianne Tea bags)
Let steep for about 10 minutes.
meanwhile bring another quart of water to a boil.
Add a large handful on fresh mint to the water remove from heat and cover pot, if using an open pot.
Allow mint to steep for 10-15 minutes.
Pour tea into a large pitcher. Add steeped mint poured through a sieve into the tea. This just catches the mint and keeps you from having to fish it out of the pitcher!
Add a about quarter of a can of lemonade and a about quarter of a can of orange juice concentrate to the mint tea
Stir in 3/4 cup of sugar (it seems like a lot but it really does take a good bit of sugar) Taste, add more sugar if you think it needs it.
Chill and serve over lots of ice!

Monday, April 9, 2012

Easter


The Menu:

Spiral Ham
Mom's Potato Salad
Roasted Asparagus
Old Fashion Baked Beans
Deviled Eggs
Rosemary Foccacia
Dinner Rolls
Sour Cream Cheesecake topped with cherries
Strawberry Roulade
Mint Tea

Easter is one of our favorite holidays here at Waterberry Farm. Usually the whole family gathers at the farm to celebrate the Resurrection of our Lord. This year unfortunately, for various reasons, not everyone could make it to the farm for Easter. In spite of missing the ones who didn't make it home, we had a great day. The weather was lovely so we set up a table on the porch and ate outside. It was a gorgeous day to sit on the porch, sip mint iced tea, talk, and watch the squirrels chase each other from tree to tree. 

Our Easter menu is pretty much the same from year to year. One item we always include are these old fashioned baked beans. These are a family favorite. This is a very old recipe from the Mennonite side of the family. These beans are nothing like traditional baked beans from a can. For starters they are made with lima beans. Once you've had these baked beans they may become a part of your Easter menu too!

Old-Fashioned Baked Beans

2 cans large lima beans (or 2 cups dried lima beans soaked overnight and cooked until tender)
1/2 cup yellow onion, diced
1/2 cup green bell pepper, diced
1/3 cup brown sugar
1 teaspoon dried mustard
1 14.5 ounce can diced tomatoes
salt and pepper
4 slices bacon

Preheat oven to 325 degrees.
Drain the lima beans but reserve the liquid. In a large shallow baking dish, combine the beans, onions, bell pepper, brown sugar, dried mustard, and diced tomatoes. Season to taste with salt and pepper. Lay the strips of bacon in rows across the top of the beans. Bake the beans for at least 2 hours. Checking periodically. If the beans start to look a little dry, pour a little of the reserved liquid from the beans over the top. You may not need to add any of the liquid to the beans. Only add it if the beans begin to look dry they've finished baking. Let the cooked beans cool a bit before serving, about 10 minutes.

Here are just a few more pictures...to make you drool!


Yes, this did taste as good as it looks!

Sunday, March 18, 2012

What's new at Waterberry...


With Spring just days away, I wanted to show what's been going on around here for the past few months. One of our green houses got a new cover. The cover was ripped off in a storm last year. Replacing it is quite a process! Lots of hands an NO wind are required.

The new cover ready to go!

A ball tied in the plastic with a rope. The ball is tossed over the top to someone on the other side. That's how we get the cover over the top!

Everyone grabs a ropes and pulls until the cover is in place.
 We picked a sunny day in early February to get the job done. It felt like a calm day but as we started putting the new cover on a light wind made the job quite a bit more difficult, but in the end we got the job done!
Ready for a new growing season!


Tuesday, October 11, 2011

A rainy day in Autumn

Here area few pictures from a rainy Autumn day on the farm. Fall is a beautiful time of the year!

Monday, July 18, 2011

Making Chow Chow

The origins of chow chow is somewhat debated but basically it was a way to preserve the vegetables at end of the growing season. It's a pickled relish made from a combination of many vegetables. It can include a variety of vegetables such as cucumber, peppers, celery, corn, lima beans, carrots, peppers, onions...etc.  Chow chow can be eaten by itself or as a condiment on hot dogs and hamburgers, with mashed potatoes or pinto beans. This recipe is an old Pennsylvanian Dutch chow chow. It's mustard based and contains a variety of summer vegetables. Southern style chow chows are similar but usually contain spicy peppers, green tomatoes, and cabbage or cauliflower. You could really add almost any vegetable to the mix.

Chow Chow

Ingredients:
1 quart cucumber, diced
1 quart Lima beans
1 quart green beans, cut into pieces
1 quart sweet corn
1 pint green pepper, diced
1 pint red pepper, diced
1 pint celery, diced
1 cup onion, diced
1 Tablespoon dry mustard
2 cups sugar
4 cups vinegar

Bring a large pot of water to a boil. Cook all the vegetables separately, about 3 minutes each, until tender but not soft. Drain cooked vegetables and mix together. In a large pot, combine the, sugar, vinegar, and mustard. Bring to a boil. Add all the vegetables and bring to a boil. Put immediately  into hot mason jars and seal.


Put the hot chow chow into hot quart or pint jars. It's best to wash them in the dishwasher and dry on high heat. Leave them in the dishwasher until ready to use. Make sure your jars have no nicks on the rims and the jars are not cracked. They cannot seal if the rim is nicked. Cracked jars should be discarded. In a small pot or skillet, add about an inch of water. Place the lids for the jars in the water and bring to a boil. Leave them in the hot water until ready to use.

After the jar is filled to about a 1/2 an inch from the top, using a clean damp cloth, wipe the top rim of the jar. If there is anything on the rim of the jar it will not make a tight seal.

Take a lid from the hot water and place it on the top of your filled jar.


Add the ring to the top of the jars and tighten as tight as you can get them. Be careful as you tighten the jars. You may have to wear an oven mitt or use a dish towel when you do this as the jars will be very hot.

Your jars should begin sealing within 30 minutes or so as they cool down. You should hear a popping sound to indicate that they are sealing. The jars are sealed when the "button" on the tops of the lids are flat. If they do not flatten, your jar is not sealed and you must either process the unsealed jar in a hot water bath or keep the jar in the refrigerator. 

Tuesday, July 5, 2011

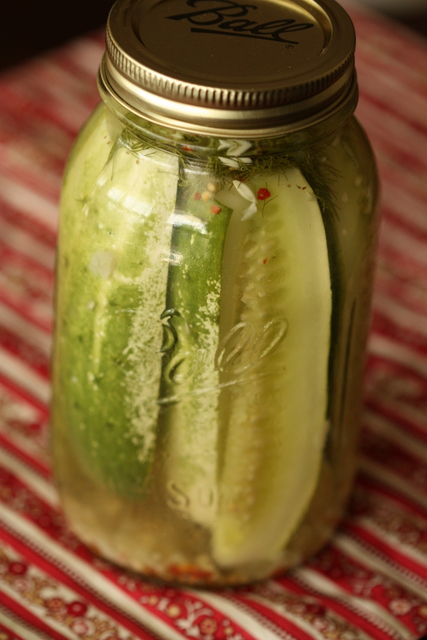
Crisp Claussen-style Dill Pickles

We've got lots of cucumbers at the farm right now. That means it's time to make pickles! This is a recipe for Claussen-like pickles. It's a simple, very quick pickling method. These pickles are a refrigerator pickle. They are not canned. This gives the pickles the crisp snap of a Claussen pickle. They are ready to eat about a week after you jar them and will last, refrigerated, for 6 months to a year.


1 gallon pickling cucumbers, do not use waxed grocery store cucumbers
6 garlic cloves, minced
1/2 tablespoon mustard seeds
6 heads fresh dill, or 6 sprigs fresh dill weed and 1/2 tablespoon dill seeds
pinch of red pepper flakes
1 1/2 quarts water
2 cups cider vinegar
1/2 cup canning salt


Boil liquids and seasonings to dissolve the salt then cool to room temperature. Slice the ends off of the cucumbers. The blossom end of the cucumber will make the pickles soft if left on the cucumber. Then slice the cucumbers lengthwise into quarters add to jars along with the dill.
 Pour over pickles and refrigerate. Shake the jars of pickles at least once a day to redistribute the spices. The pickles will be ready to eat in about a week. They will be good for about 6 months kept in the refrigerator.

If you live near the Slocomb area, we've a lots of pickling cucumbers, right now! As with all of our produce, no herbicides or pesticides are used in the production of our cucumbers. Give us a call if you'd like to stop by and purchase some of our cukes and make your own pickles. Ask about what else is growing on the farm right now.

Wednesday, June 2, 2010

Waterberry hits the road...

Well not Waterberry, it's still right there in Slocomb, but the farm has been shut down for the summer. After all these years of farming we decided it was time for a break from working. So we've closed up the greenhouses, packed up the camper, and hit the road! We're on our way to Alaska for the summer. Yup, we're driving all the way to Alaska. Once there will be spending the summer volunteering at Camp Victory in Sutton.


Don't worry we'll be back sometime in September and be ready to start growing again, but for now this is our home!!


.For updates on our trip and highlights from our summer, check out our other blog at www.lifeintheotherla.blogspot.com